At WP SiteKit we design and build websites for small businesses with the best software and plugins in the market. To help you conduct SEO, search engine optimization, on your blog posts and web pages we’ve chosen the Yoast SEO plugin as the primary tool to use. Every website we build already has the Yoast SEO plugin installed and configured properly.
This article will teach you how to use Yoast SEO to optimize your blog posts individually so they rank higher in the search engines. I’ll explain only the most important elements you need to focus on as the author and website owner. However, if you want to learn more from the software publisher, here is the official Yoast SEO Beginner’s Guide.
Here are the basic steps to use the Yoast SEO Plugin
- Open the page or post
- Open the Yoast SEO section at the bottom of the page
- Enter a Focus Keyphrase
- Click on the Google preview to open the editor
- Write an SEO Title With Your Target Keyphrase
- Write a Meta Description With Your Target Keyphrase
- Follow all the recommendations in the SEO Analysis section
- Publish the post
1. Open the WordPress Page or Post
First, you must be logged into WordPress.
Then you must open an existing Post or create a new Post.
You can either use the Yoast SEO plugin at the beginning of writing your content or you can use it after you’ve completed writing your article. We advise you to focus on writing quality content for your readers first and then use the Yoast recommendations at the end to edit and further optimize your post.
2. Open the Yoast SEO Section at the Bottom of the Page
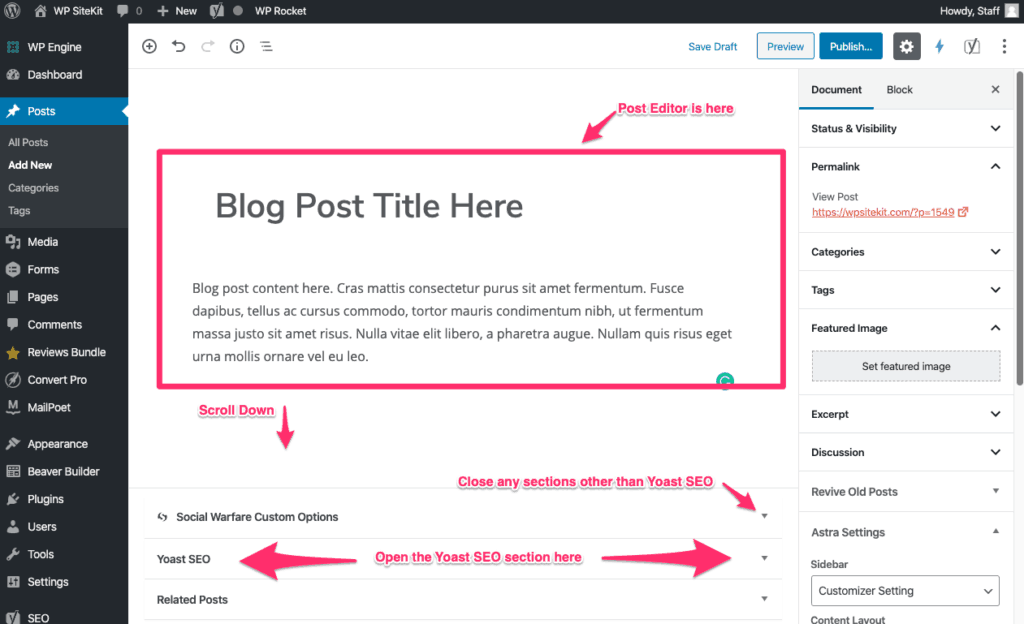
Scroll down the page below the Post Editor section.
Close any sections other than Yoast SEO.
Open the Yoast SEO section.
3. Enter a Focus Keyphrase
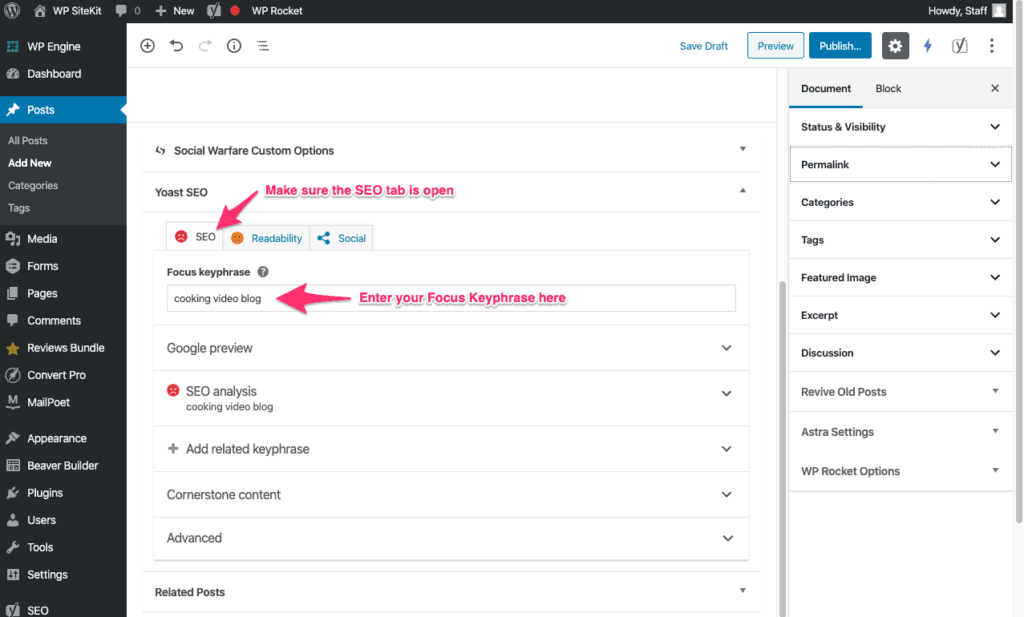
Make sure the SEO tab is open in Yoast
In the Focus Keyphrase box enter the keyword or keyphrase that you want to try to rank for. This should be between 1 and 5 words. Do not use a comma. This is 1 key phrase.
The fewer words you use in the target keyphrase then the more people are searching for that term. However, the competition will be higher and it’s harder to appear on the first page of Google. Example “cooking”.
The more words you use in your keyphrase the more niche it is and fewer people are searching for that term. However, it will also have less competition and you will have a better chance of appearing on the first page of Google. Example “cooking video blog”.
A good practice is to always niche some, like using 2-4 words so that your article appears to people searching for exactly what you are writing about. Example “make cooking video blog” is easier to rank for because it has 4 words and will be shown to people who want to learn to make their own cooking video blog.
At WP SiteKit, we offer a Managed Website Package which includes a list of target keyphrases that you should create content around and optimize for.
4. Open the Google Preview Editor
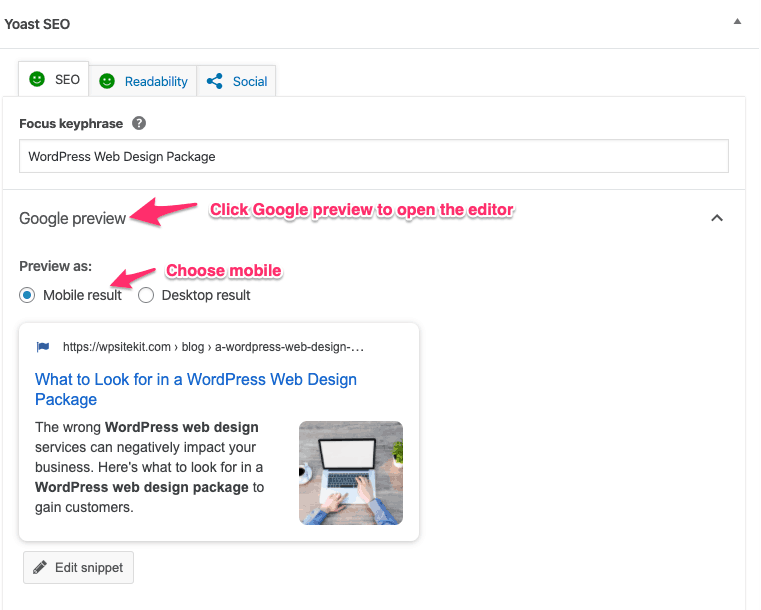
Click the Google Preview tab to open that section.
Make sure the Preview as is set to “Mobile result”.
5. Write an SEO Title With Your Target Keyphrase
Write a short title of your article that includes your target keyphrase.
A good length is 50-60 characters. Look at the Yoast title length suggestion bar to tell if your title is a good length. You want it to be green.
Use the button “Insert snippet variable” to insert the “Separator” and “Site title” at the end of your title.

See here for more best practice on how to write a great SEO title.
6. Write a Meta Description With Your Target Keyphrase
Write a Meta Description that gives an overview of what the visitor will learn when they read this page.
It should be about 155 characters, include your target keyphrase and entice the visitor to read the page.

See here for more best practices on how to write an effective meta description.
7. Follow all the recommendations in the SEO Analysis section
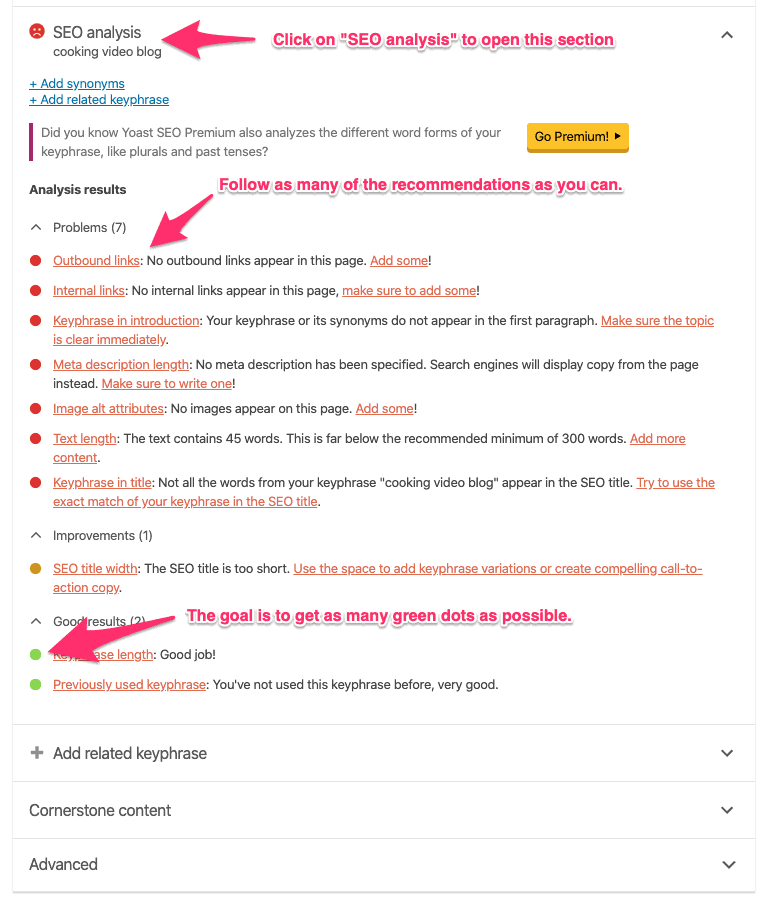
Click the “SEO analysis” button to open that section.
In the Analysis, Results section read and apply as many of the recommendations as possible.
The goal is to get as many green dots as possible.
8. Publish the post
Once you’re finished applying as many optimizations as possible click the “Publish” button in the top right to make the changes apply to your live website.

